Scanning and Adding Attachments to a Prescription
Prescription imaging links a scanned copy of an original written prescription to one or more prescriptions in PharmaClik Rx. All prescription-related documents such as special authorization forms, transfers received from other pharmacies, authorization requests, etc... should be scanned and linked to prescriptions. This provides a quick method of retrieving and verifying written prescriptions/documents for day-to-day practice, as well as during an audit.
Miscellaneous office and image files can also be attached to prescriptions; this feature is available regardless if a scanner is installed or not.
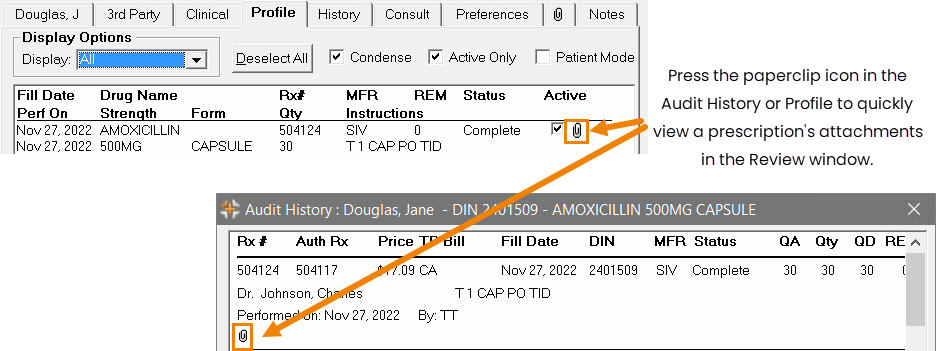
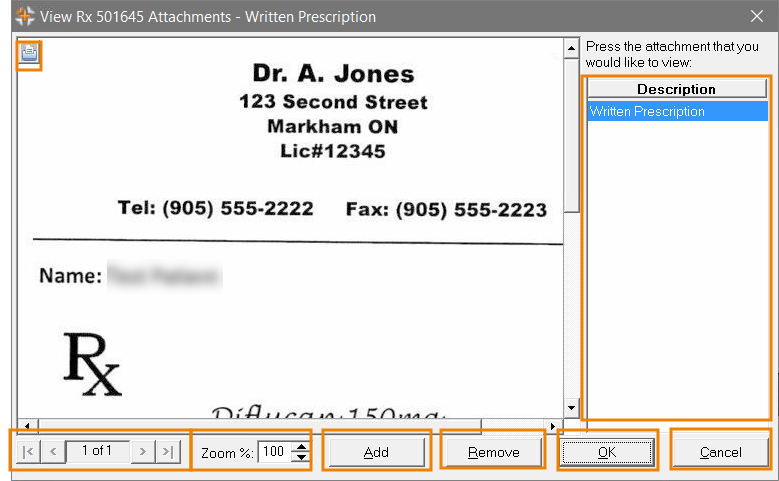
Prescription attachments (scanned images, as well as document files) are displayed in a View Rx Attachments window, easily accessible from the Workbench, Rx Detail, Audit History, and the patient's Profile; multiple documents can be attached to a prescription. A paperclip icon in the Profile and Audit History identifies prescriptions with attachments and provides a quick shortcut to the images/attachments.
For more information, select the dropdowns below.
When scanning from the Workbench, it is possible to attach the scanned document to multiple prescriptions (i.e., if a written prescription contains multiple drugs on the same page). The selected prescriptions must belong to the same patient.
When prescriptions are highlighted on the Workbench:
-
Place the document in the scanner.
-
Go to the Workbench.
-
Highlight the prescription(s) to which the scanned document will be linked.
Before highlighting the prescriptions, press Deselect All to ensure extra prescriptions are not highlighted.
-
Select Rx > Attachments.
-
Select the Single Scan or Duplex Scan option. A prompt appears to confirm the select prescription(s) and the patient's name.
-
Select OK to continue. The Preview Image window opens and the scanner begins scanning the document - a progress bar appears on the window. Wait until the scanned image is displayed in the preview window.
Select Cancel to abort the scan.
-
If necessary, make any adjustments using the edit options on the right side of the window. If you are not satisfied with the scan, re-position the document in the scanner, select Rescan.
To scan in colour, choose Colour from the Type dropdown list and select Rescan.
-
Choose a Description from the dropdown list or type a custom description.
-
Select Accept to save the image and close the window.
When no prescriptions are highlighted on the Workbench:
-
Place the document in the scanner.
-
Go to the Workbench.
Select Deselect All to ensure no prescriptions are highlighted.
-
Select Rx > Attachments.
-
Select the Single Scan or Duplex Scan option. The Select Prescription window opens. Search for the prescription(s) by Rx# or Patient.
-
To search by Rx#: enter the prescription number(s) in the Rx(s) field and select OK.
-
To search by patient: enter the patient's name in the Patient field and select OK. Patient Search opens. Highlight the patient in the search results and select OK. The patient's Profile appears. Highlight the prescription(s) and select OK.
A prompt confirms the selected prescription(s) and the patient's name.
-
-
Select OK to continue. The Preview Image window opens and the scanner begins scanning the document - a progress bar appears on the window. Wait until the scanned image is displayed in the preview window.
Select Cancel to abort the scan.
-
If necessary, make any adjustments using the edit options on the right side of the window. If you are not satisfied with the scan, re-position the document in the scanner, select Rescan.
To scan in colour, choose Colour from the Type dropdown list and select Rescan.
-
Choose a Description from the dropdown list or type a custom description.
-
Select Accept to save the image and close the window.
When scanning from the Profile, it is possible to attach the scanned document to multiple prescriptions.
-
Open the Patient Folder.
-
Select the Profile tab.
-
Highlight the prescription(s) on the Profile.
The prescriptions DO NOT need to be the same status (i.e., it is possible to highlight a Complete and an Amend prescription).
-
Select Rx > Attachments.
-
Select the Single Scan or Duplex Scan option. A prompt confirms the selected prescription(s) and patient's name.
-
Select OK. The Preview Image window opens and the scanner begins scanning the document - a progress bar appears on the window. Wait until the scanned image is displayed in the preview window.
-
If necessary, make any adjustments using the edit options on the right side of the window. If you are not satisfied with the scan, re-position the document in the scanner, select Rescan.
To scan in colour, choose Colour from the Type dropdown list and select Rescan.
-
Choose a Description from the dropdown list or type a custom description.
-
Select Accept to save the image and close the window.
When scanning from Rx Detail, the image is only linked to the prescription that is currently displayed.
-
Open the prescription in Rx Detail.
-
Select Rx > Attachments.
-
Select the Single Scan or Duplex Scan option. A prompt confirms the selected prescription(s) and patient's name.
-
Select OK. The Preview Image window opens and the scanner begins scanning the document - a progress bar appears on the window. Wait until the scanned image is displayed in the preview window.
-
If necessary, make any adjustments using the edit options on the right side of the window. If you are not satisfied with the scan, re-position the document in the scanner, select Rescan.
To scan in colour, choose Colour from the Type dropdown list and select Rescan.
-
Choose a Description from the dropdown list or type a custom description.
-
Select Accept to save the image and close the window.
Selecting Revert in Rx Detail does not remove the newly scanned images from the prescription. If you have scanned an image into the incorrect prescription, it must be removed manually.
Scanned documents remain linked to the Rx# to which they were attached; they are not carried forth on refills. However, a paperclip icon on the Profile and Audit History identifies prescriptions with attachments and provides a quick shortcut to the attachments. This is useful when staff need to consult the original written prescription - a scanned copy of the prescription is right on the window, eliminating the need to sort through old file boxes.
A written prescription was scanned for a new prescription (the first prescription in the Audit History). Upon refilling, the patient questions the number of remaining refills. Rather than sorting through old file copies, the pharmacist looks at the prescription's Audit History and selects the paperclip for the original prescription - the View Rx Attachments window opens, displaying the scanned prescription.

Select the fields below for a brief description of the functionality.

The View Rx Attachments window can be accessed from the Review action button on the Workbench or Rx menu. The following steps explain how to use the Review action button, as it is the quickest method of viewing attachments from the Workbench.
When prescriptions are highlighted on the Workbench:
-
Go to the Workbench.
-
Highlight the prescription(s).
-
Select Review. The View Rx Attachments window opens.
-
Select OK or Cancel when you are finished viewing the attachments. If multiple prescriptions were selected, the next prescriptions opens in the View Rx Attachments window. The window returns to the Workbench upon selecting OK or Cancel for the final prescription.
When no prescriptions are highlighted on the Workbench:
-
Go to the Workbench.
Select Deselect All to ensure no prescriptions are highlighted.
-
Select Review. The Select Prescription window opens. Search for the prescription(s) by Rx# or Patient.
-
To search by Rx#: enter the prescription number(s) in the Rx(s) field and select OK.
-
To search by patient: enter the patient's name in the Patient field and select OK. Patient Search opens. Highlight the patient in the search results and select OK. The patient's Profile appears. Highlight the prescription(s) and select OK.
The View Rx Attachments window opens.
-
-
Select OK or Cancel when you are finished viewing the attachments. If multiple prescriptions were selected, the next prescriptions opens in the View Rx Attachments window. The window returns to the Workbench upon selecting OK or Cancel for the final prescription.
The View Rx Attachments window can be accessed from the Rx action Review or from the prescription's paperclip icon.
Viewing Attachments for One Prescription
-
Open the Patient Folder.
-
Select the Profile tab.
-
Locate the prescription on the Profile.
-
Select the paperclip icon located to the right of the prescription's Active flag. The View Rx Attachments window opens.
-
Select OK or Cancel when you are finished viewing the attachments.
Viewing Attachments for Multiple Prescriptions
-
Open the Patient Folder.
-
Select the Profile tab.
-
Highlight the prescriptions on the Profile.
The prescriptions DO NOT need to the same status (i.e., it is possible to highlight a Complete and an Amend prescription).
-
Select Rx > Review. The View Rx Attachments window opens.
-
Select OK or Cancel when you are finished viewing the attachments. The next prescriptions opens in the View Rx Attachments window. The window returns to the Profile upon selecting OK or Cancel for the final prescription.
When viewing attachments from Rx Detail, the View Rx Attachments window opens for the prescription that is currently displayed.
-
Open the prescription in Rx Detail.
-
Select Rx > Review. The View Rx Attachments window opens.
-
Select OK or Cancel when you are finished reviewing the attachments.
-
Open the prescription's Audit History as usual.
-
Locate the prescription in the Audit History.
-
Select the paperclip icon located below the prescription's Performed On field. The View Rx Attachments window opens.
-
Select OK or Cancel when you are finished viewing the attachments.
It is possible to highlight the prescription in the Audit History and select Review.
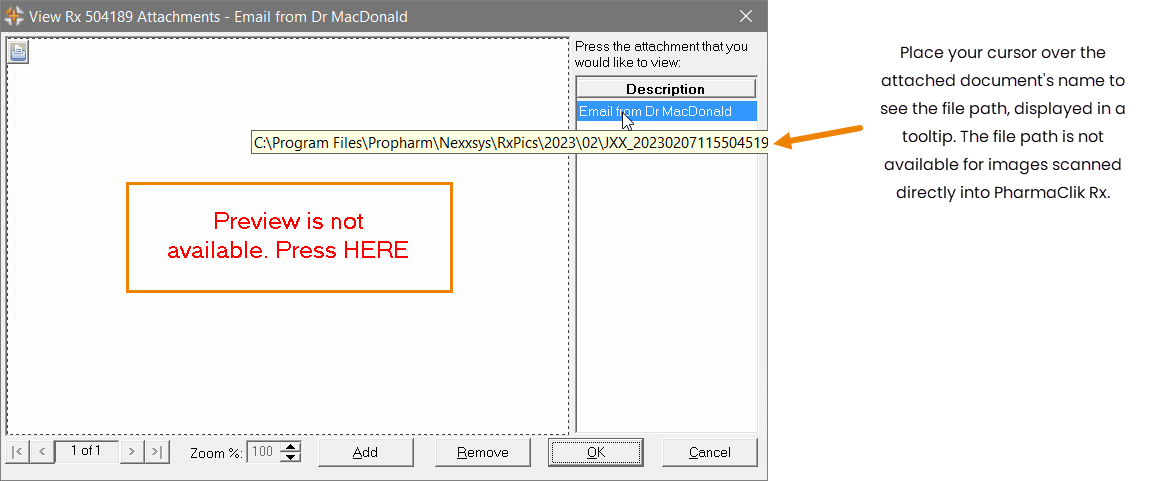
Miscellaneous documents and image files can be attached to a prescription (i.e., non-scanned images). For example, if you record patient counselling notes in a Microsoft Word document, the document can be attached to the prescription.
When a non-image file is attached to a prescription, the View Rx Attachments window indicates "Image is not available. Press HERE to open file." Select the text to open the attachment in its own program (i.e., if the attachment is a Microsoft Word document, the attachment opens in Microsoft Word).

To add an attachment:
-
Open the prescription's View Rx Attachments window using one of the methods outlined above.
The paperclip icon does not appear in the Profile or Audit History if the prescription does not have existing attachments. From the Profile, highlight the prescription and select Rx > Review. From the Audit History, highlight the prescription and select Review.
-
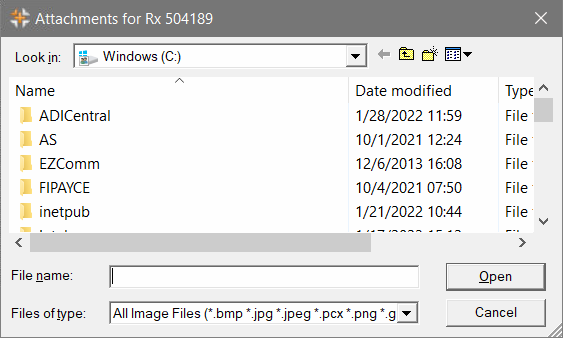
Select Add. The Attachments for Rx window opens.

-
Make a selection from the Files of type dropdown list (All Image Files or All Office Files), depending on the type of file you are attaching.
-
Browse for and select the file, as you would normally with other Windows applications.
-
Select Open. The window returns to the View Rx Attachments window. A New Attachment is displayed in the Attachment list.
-
Right-click on New Attachment to edit the field. Choose a description from the dropdown list or type a custom description.
-
Select OK to save the changes and close the window.
One or multiple attachments can be removed from a prescription.
-
Open the prescription's View Rx Attachments window using one of the methods outlined above.
-
In the Attachments list, highlight the attachment(s) to be removed.
To remove multiple attachments, hold down the CTRL key on the keyboard while highlighting the attachments.
-
Select Remove. A confirmation similar to the following appears; it lists the descriptions of all selected attachments.

-
Select Yes to remove the attachments. The attachments are removed from the Attachments list.
Selecting No aborts the remove request.
-
Select OK to save the changes and close the window.
Descriptions are assigned to an attachment at the time of scanning into PharmaClik Rx, or manually adding a miscellaneous file to a prescription. The descriptions identify the attachments in the View Rx Attachments window and Link Images window.
To modify a description:
-
Open the prescription's View Rx Attachments window, using one of the procedures described above.
-
In the Attachments list, use the mouse to right-click on the name of the attachment to be modified. The field becomes editable and a dropdown arrow is available. Choose a description from the dropdown list, or type a custom description.

-
Select OK to save the changes and close the window.